


流程如下:
- 先使用 Filebeat 把日志收集起来,然后把数据再传给 Logstash。
- 通过 Logstash 强大的数据清洗功能。
- 最终把数据写入到 Elasticsearch 中。
- 并由 Kibana 进行可视化
参考文档:
https://www.51cto.com/article/707776.html
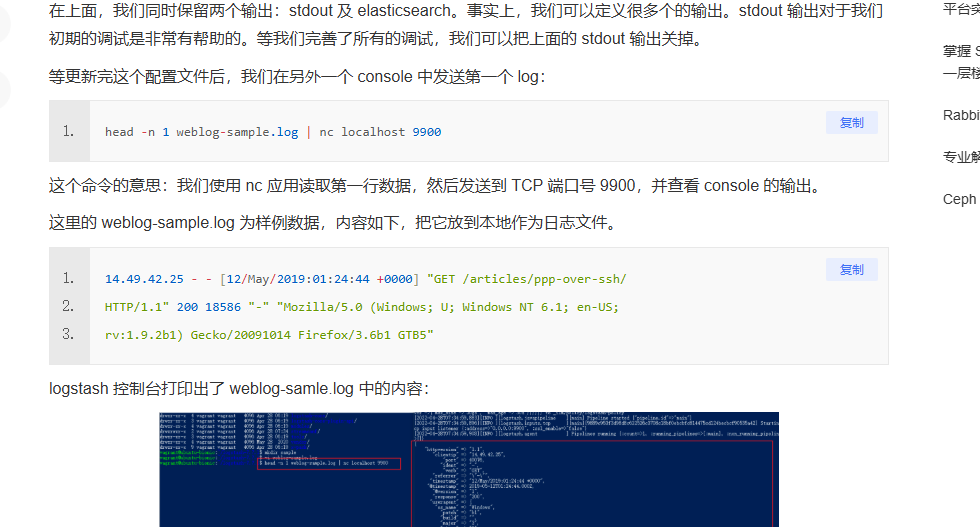
踩的坑:
- 指定配置文件启动
安装nc
sudo dnf install -y nc

nc -h
bin/logstash -f /logstash-7.7.1/streamconf/weblog.conf
- 脚本文件
先转化为unix系统的脚本文件
sudo yum install dos2unix   # 对于 CentOS 或 RHEL 系统
dos2unix start.sh
# nohup bin/logstash -f streamconf/weblog.conf &
#!/bin/bash

# Logstash 配置文件路径
CONFIG_PATH="streamconf/weblog.conf"

# 查找 Logstash 进程的 PID
PID=$(ps aux | grep "logstash" | grep -v "grep" | awk '{print $2}')

# 如果有 Logstash 进程在运行,则先杀死它
if [ ! -z "$PID" ]; then
    echo "发现 Logstash 进程 (PID: $PID),正在停止..."
    kill -9 $PID
    echo "Logstash 进程已停止。"
else
    echo "没有发现 Logstash 进程。"
fi

# 启动 Logstash
echo "启动 Logstash..."
nohup bin/logstash -f $CONFIG_PATH &

echo "Logstash 启动命令已执行,后台运行中..."

# tail -f  -n 30 nohup.out
配置文件
logstash
weblog.conf
input {
  beats {
    port => "9900"  # 接收 Filebeat 日志的端口
  }
}

filter {

    grok {
      match => { "message" => "%{COMBINEDAPACHELOG}" }
    }
    mutate {
      convert => { "bytes" => "integer" }
    }
    geoip {
      source => "clientip"
    }
    useragent {
      source => "user_agent"
      target => "useragent"
    }
    date {
      match => ["timestamp", "dd/MMM/yyyy:HH:mm:ss Z"]
      target => "@timestamp"
    }
	if [level] == "stat" {
	  drop { }
	}

}

output {
  # 输出到 Elasticsearch,根据 index_prefix 动态生成索引
  elasticsearch {
    hosts => ["localhost:9200"]
    user => "elastic"
    passsword => "xxx"
    index => "%{index_prefix}"  # 动态索引
  }

  # 输出到控制台(调试用,可选)
  stdout {
    codec => rubydebug
  }
}
start.sh
# nohup bin/logstash -f streamconf/weblog.conf &
#!/bin/bash

# Logstash 配置文件路径
CONFIG_PATH="streamconf/weblog.conf"

# 查找 Logstash 进程的 PID
PID=$(ps aux | grep "logstash" | grep -v "grep" | awk '{print $2}')

# 如果有 Logstash 进程在运行,则先杀死它
if [ ! -z "$PID" ]; then
    echo "发现 Logstash 进程 (PID: $PID),正在停止..."
    kill -9 $PID
    echo "Logstash 进程已停止。"
else
    echo "没有发现 Logstash 进程。"
fi

# 启动 Logstash
echo "启动 Logstash..."
nohup bin/logstash -f $CONFIG_PATH &

echo "Logstash 启动命令已执行,后台运行中..."

tail -f  -n 30 nohup.out
filebeat
filebeat_apache.yml
filebeat.inputs:
- type: log
  enabled: true
  paths:
    - /xxx1/xxx/server/xxx2/log/**/*.log
    - /xxx1/xxx/server/xxx2/logslave/**/*.log
  fields:
    index_prefix: "test-xx-xxx2"  # 设置 Index 前缀
  fields_under_root: true  # 将自定义字段放到顶层
  ignore_older: 360h        # 忽略超过 24 小时的日志(根据需求调整)

- type: log
  enabled: true
  paths:
#    - /xxx1/gozero/wann-user-api/log/*.log
    - /xxx1/gozero/wann-user-api/**/*.log
  fields:
    index_prefix: "test-xx-user-api"  # 设置 Index 前缀
  fields_under_root: true
  ignore_older: 360h

- type: log
  enabled: true
  paths:
#    - /xxx1/gozero/wann-user-api/log/*.log
    - /xxx1/gozero/wann-operation-api/**/*.log
  fields:
    index_prefix: "test-xx-operation-api"  # 设置 Index 前缀
  fields_under_root: true
  ignore_older: 360h


- type: log
  enabled: true
  paths:
    - /xxx1/xxx/server/admin/log/**/*.log
  fields:
    index_prefix: "test-xx-admin"  # 设置 Index 前缀
  fields_under_root: true
  ignore_older: 360h

# output.elasticsearch:
#   hosts: ["http://ip:9200"]

output.logstash:
  hosts: ["ip:9900"]  # 将日志发送到 Logstash
start.sh
# nohup ./filebeat -e -c filebeat_apache.yml &

#!/bin/bash

# Filebeat 配置文件路径
CONFIG_PATH="filebeat_apache.yml"

# 查找 Filebeat 进程的 PID
PID=$(ps aux | grep "filebeat" | grep -v "grep" | awk '{print $2}')

# 如果有 Filebeat 进程在运行,则先杀死它
if [ ! -z "$PID" ]; then
    echo "发现 Filebeat 进程 (PID: $PID),正在停止..."
    kill -9 $PID
    echo "Filebeat 进程已停止。"
else
    echo "没有发现 Filebeat 进程。"
fi

# 启动 Filebeat
echo "启动 Filebeat..."
# nohup ./filebeat -e -c $CONFIG_PATH &
# nohup ./filebeat -e -c $CONFIG_PATH & disown
nohup ./filebeat -e -c filebeat_apache.yml & disown
# nohup ./filebeat -e -c $CONFIG_PATH > filebeat.log 2>&1 &

echo "Filebeat 启动命令已执行,后台运行中..."

# tail -f  -n 30 nohup.out
es
elasticsearch.yml
cluster.name: "my-es"
network.host: 0.0.0.0
http.port: 9200
xpack.security.enabled: true
kibana
kibana.yml
# Default Kibana configuration for docker target
server.name: kibana
server.host: "0"
elasticsearch.hosts: ["http://172.17.0.3:9200"]
xpack.monitoring.ui.container.elasticsearch.enabled: true
elasticsearch.username: "elastic"
elasticsearch.password: "password"
成品展示

配置开机自启
vim /etc/rc.local
# 加入文件绝对路径
设置登录密码
要在 Docker 环境中为您的 Elasticsearch 和 Kibana(版本 7.7.1)设置登录密码:
-
启用 Elasticsearch 安全功能:
-
Elasticsearch 默认未启用安全功能。要启用它,您需要修改
elasticsearch.yml配置文件。 -
首先,进入运行中的 Elasticsearch 容器:
docker exec -it <elasticsearch_container_name> /bin/bash -
然后,编辑
config/elasticsearch.yml文件,添加以下内容:xpack.security.enabled: true这将启用 Elasticsearch 的安全功能。
-
保存文件并退出编辑器后,退出容器并重启 Elasticsearch 容器使配置生效:
exit
docker restart <elasticsearch_container_name>
-
-
设置内置用户密码:
-
在启用安全功能后,您需要为内置用户设置密码。再次进入 Elasticsearch 容器:
docker exec -it <elasticsearch_container_name> /bin/bash -
运行以下命令以交互方式设置内置用户的密码:
./bin/elasticsearch-setup-passwords interactive按照提示,为每个内置用户(如
elastic、kibana等)设置密码。
-
-
配置 Kibana:
-
Kibana 需要使用已设置的用户名和密码来连接 Elasticsearch。编辑 Kibana 的配置文件
kibana.yml。 -
首先,进入运行中的 Kibana 容器:
docker exec -it <kibana_container_name> /bin/bash -
编辑
config/kibana.yml文件,添加以下内容:elasticsearch.username: "kibana" elasticsearch.password: "<kibana_user_password>"将
<kibana_user_password>替换为您在前一步中为kibana用户设置的密码。 -
保存文件并退出编辑器后,退出容器并重启 Kibana 容器使配置生效:
exit
docker restart <kibana_container_name>
-
-
验证配置:
-
在浏览器中访问 Kibana 的 URL(通常为
http://<your_host>:5601)。 -
此时,Kibana 应提示您输入用户名和密码。使用
elastic用户名和您之前设置的密码进行登录。
-
评论区